Oven fix
Today I am going to share how I fix one part that wore down and why it's crappy.
A while ago (probably four months) the oven decided to stop closing the doors properly, by making squeaky sounds, and then when it decides to not let me close the door without some sort of brute force. This post will push the boundaries of right-to-repair and lifetime usability of over eons.
Finding the culprit
A month ago, I decided to open the case of the oven, and found two of the obscure wheel / roller, one of them, which on the lefthand size (when viewing from front) was so worn down that the hinge dug into the actual bushing and into the screw. The righthand one didn't, which was surprising.
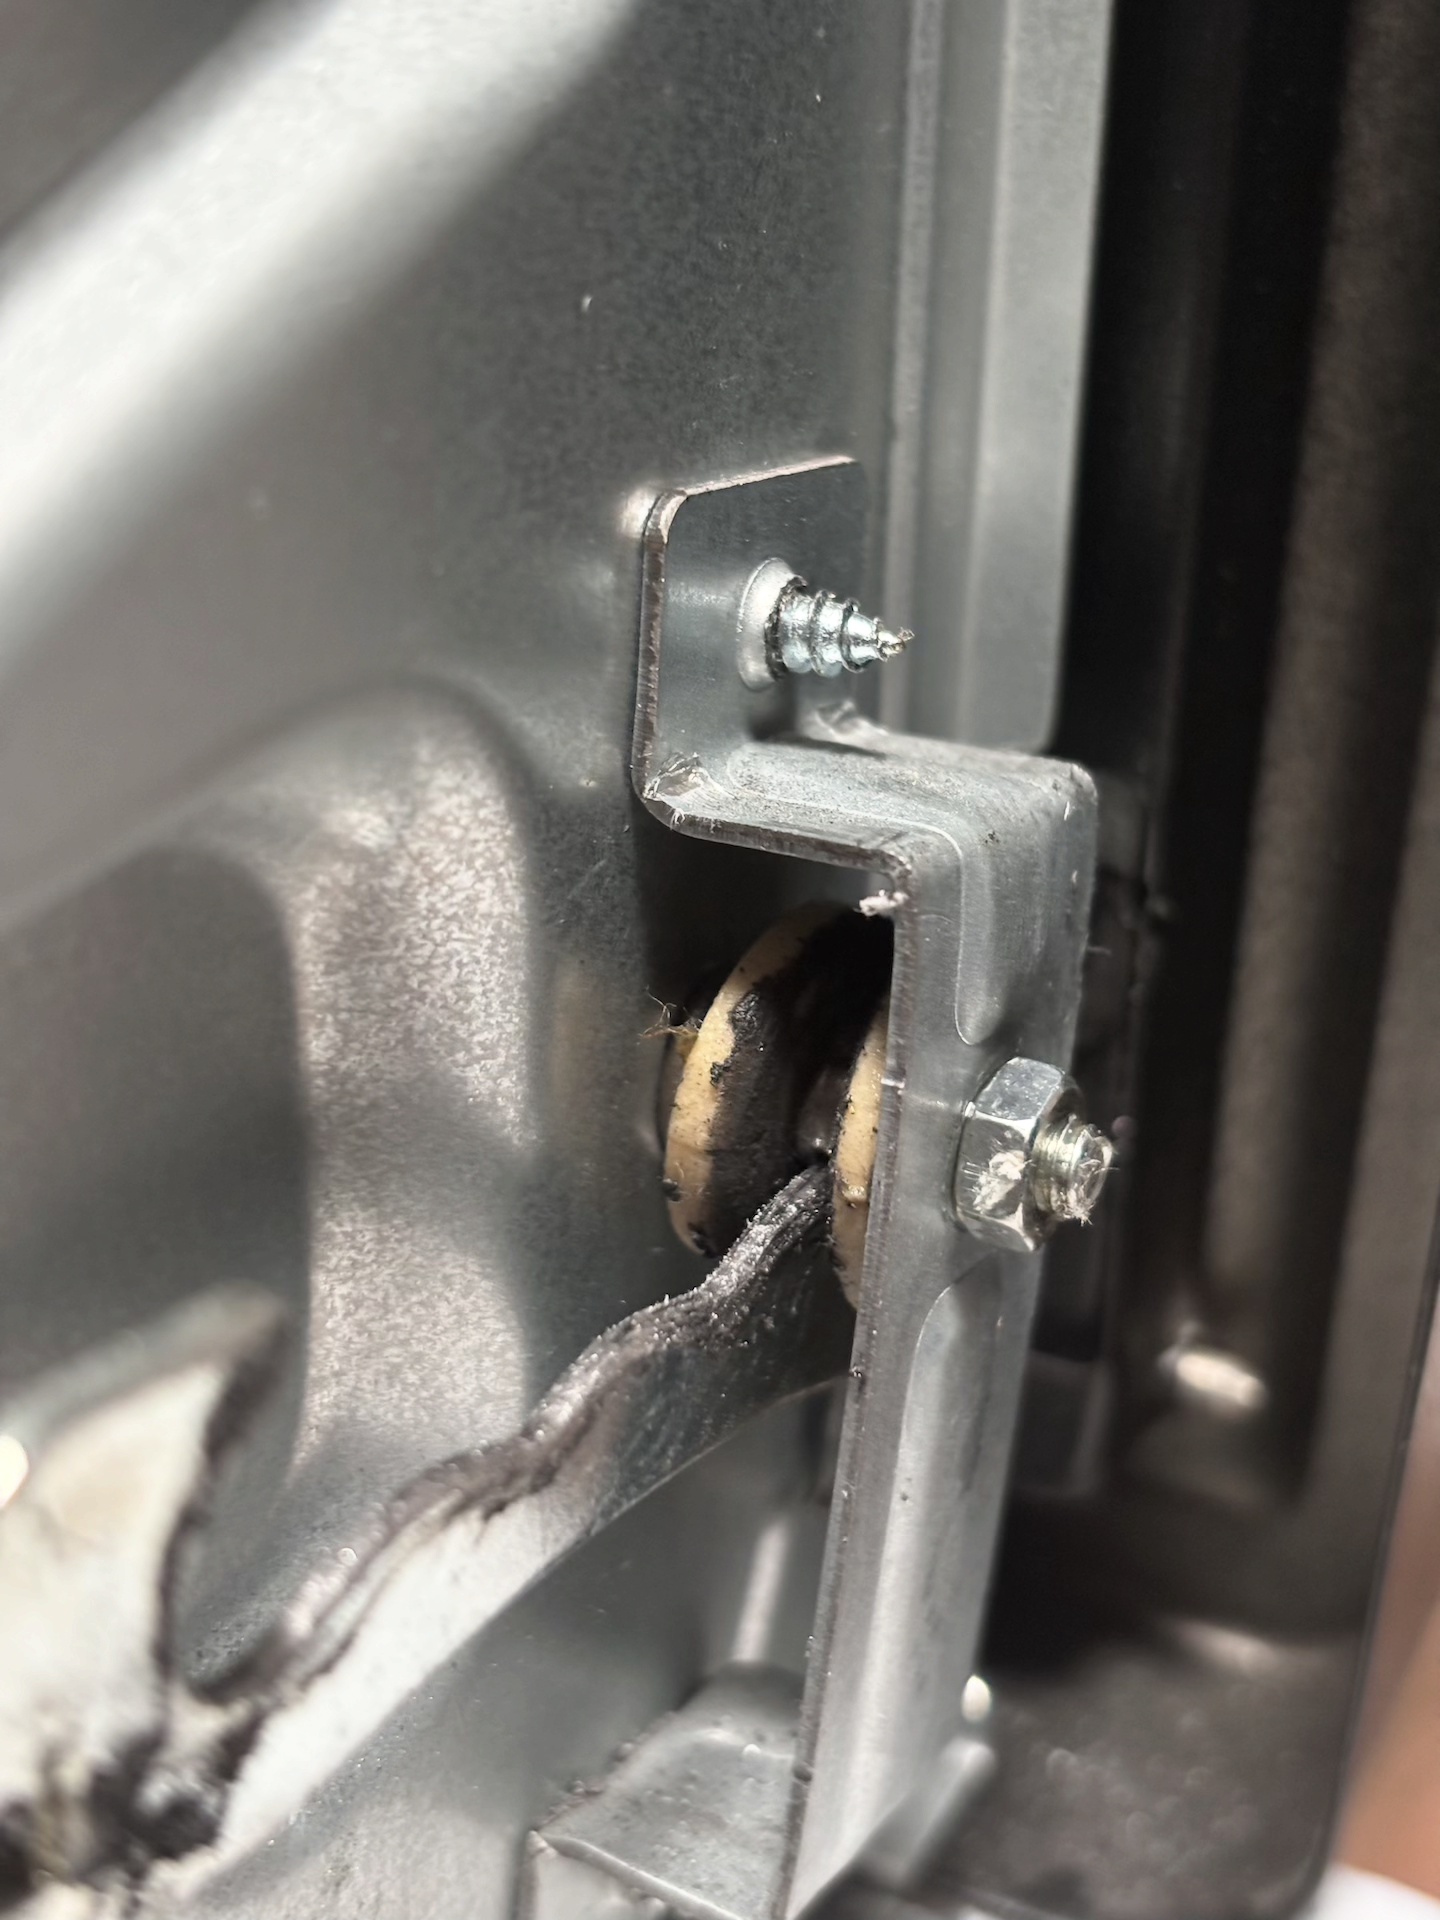 Notice the black contaminant? This is the metal ground-down by the hinge. And by the metal I mean the bushing and the screw.
I temporarily fixed these by printing it in PA6GF, but why did I said temporarily? Well we will talk about why on the next section.
The world's best fix ever, it's permanent even if it's still crappy
Since I am a BANGER CAD DESIGNER, there are two ways to create my abomination rollers, one that uses normal bearings and one that ditches 3D printing and CAD skills.
However, since there is no bearing with specific specs that fit as rollers, might as well having know-how on doing CAD, that left me the only option: use the normal bearings and 3D print the rollers.
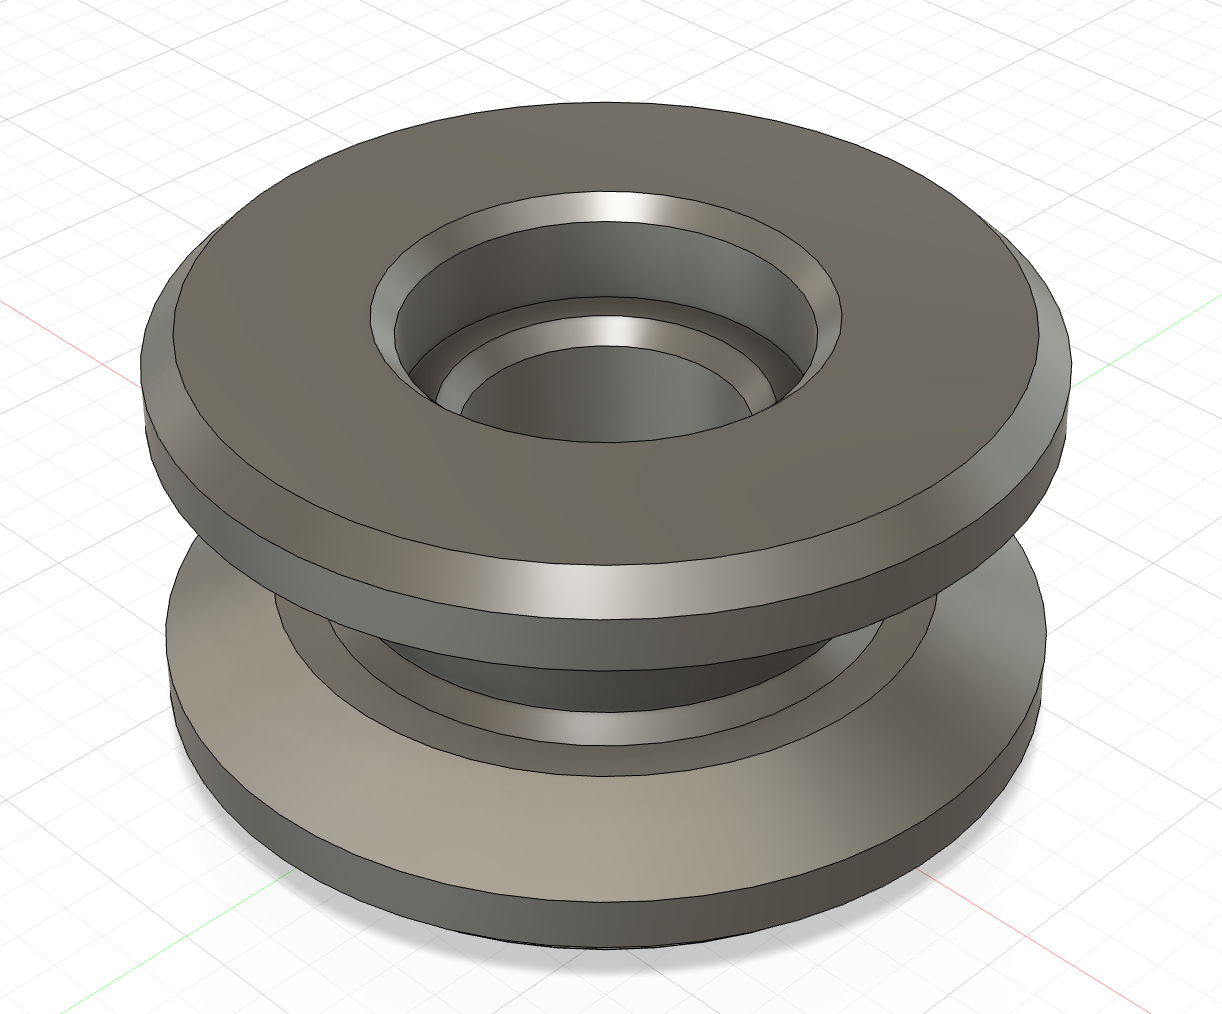 This is the part, it uses two SMR74ZZ bearings, and has no spacers, which required me some M4 washers. Starting on April 1, followers can obtain such model when they have granted access to alpha-EA repository. To find out how, please message me on Facebook and Instagram.
It will, again, be 3D printed, but, here's the problem: the previous thing printed via PA6GF from the current 3D printing tech we normal people still has access to, did not endure a significant heat. The oven can reach up to 230˚C, but the material can only endure up to around 180˚C, and since the roller is being contacted with the screw and that also contacted the inner chamber, it can be melted down easily. Although, we can use PPS or PEEK, but PPS and PEEK are expensive, PEEK adds where it's not what normal people use, and I don't know what's ethical next for them, so I did not have these.
The solution is to ask the provider like JLC or Way, to gain access to metal 3D printing! Ignore PEEK or PPS. I chose PCBWay as this round's service. There are two to many ways to 3D print metal, DMLS (or SLM), Metal Jet, or just cast through FDM / FFF. DMLS (direct metal laser sintering) or SLM (selective laser melting) is basically SLS, but with way higher laser power for printing metal. It is the metal printing method where casting is not needed.
I chose it in stainless steel, as I believe that grinds the least, next to titanium (just kidding), and the part starts at certainly expensive cost of $25, but it stayed the same until five of them, I want two. It shipped within a week. And yes, this is within Christmas 2025 and New Years Eve. Yay! That was an amazing start and goal, probably the best part of my life!
Installation (only one of them, I am watching the other one break)
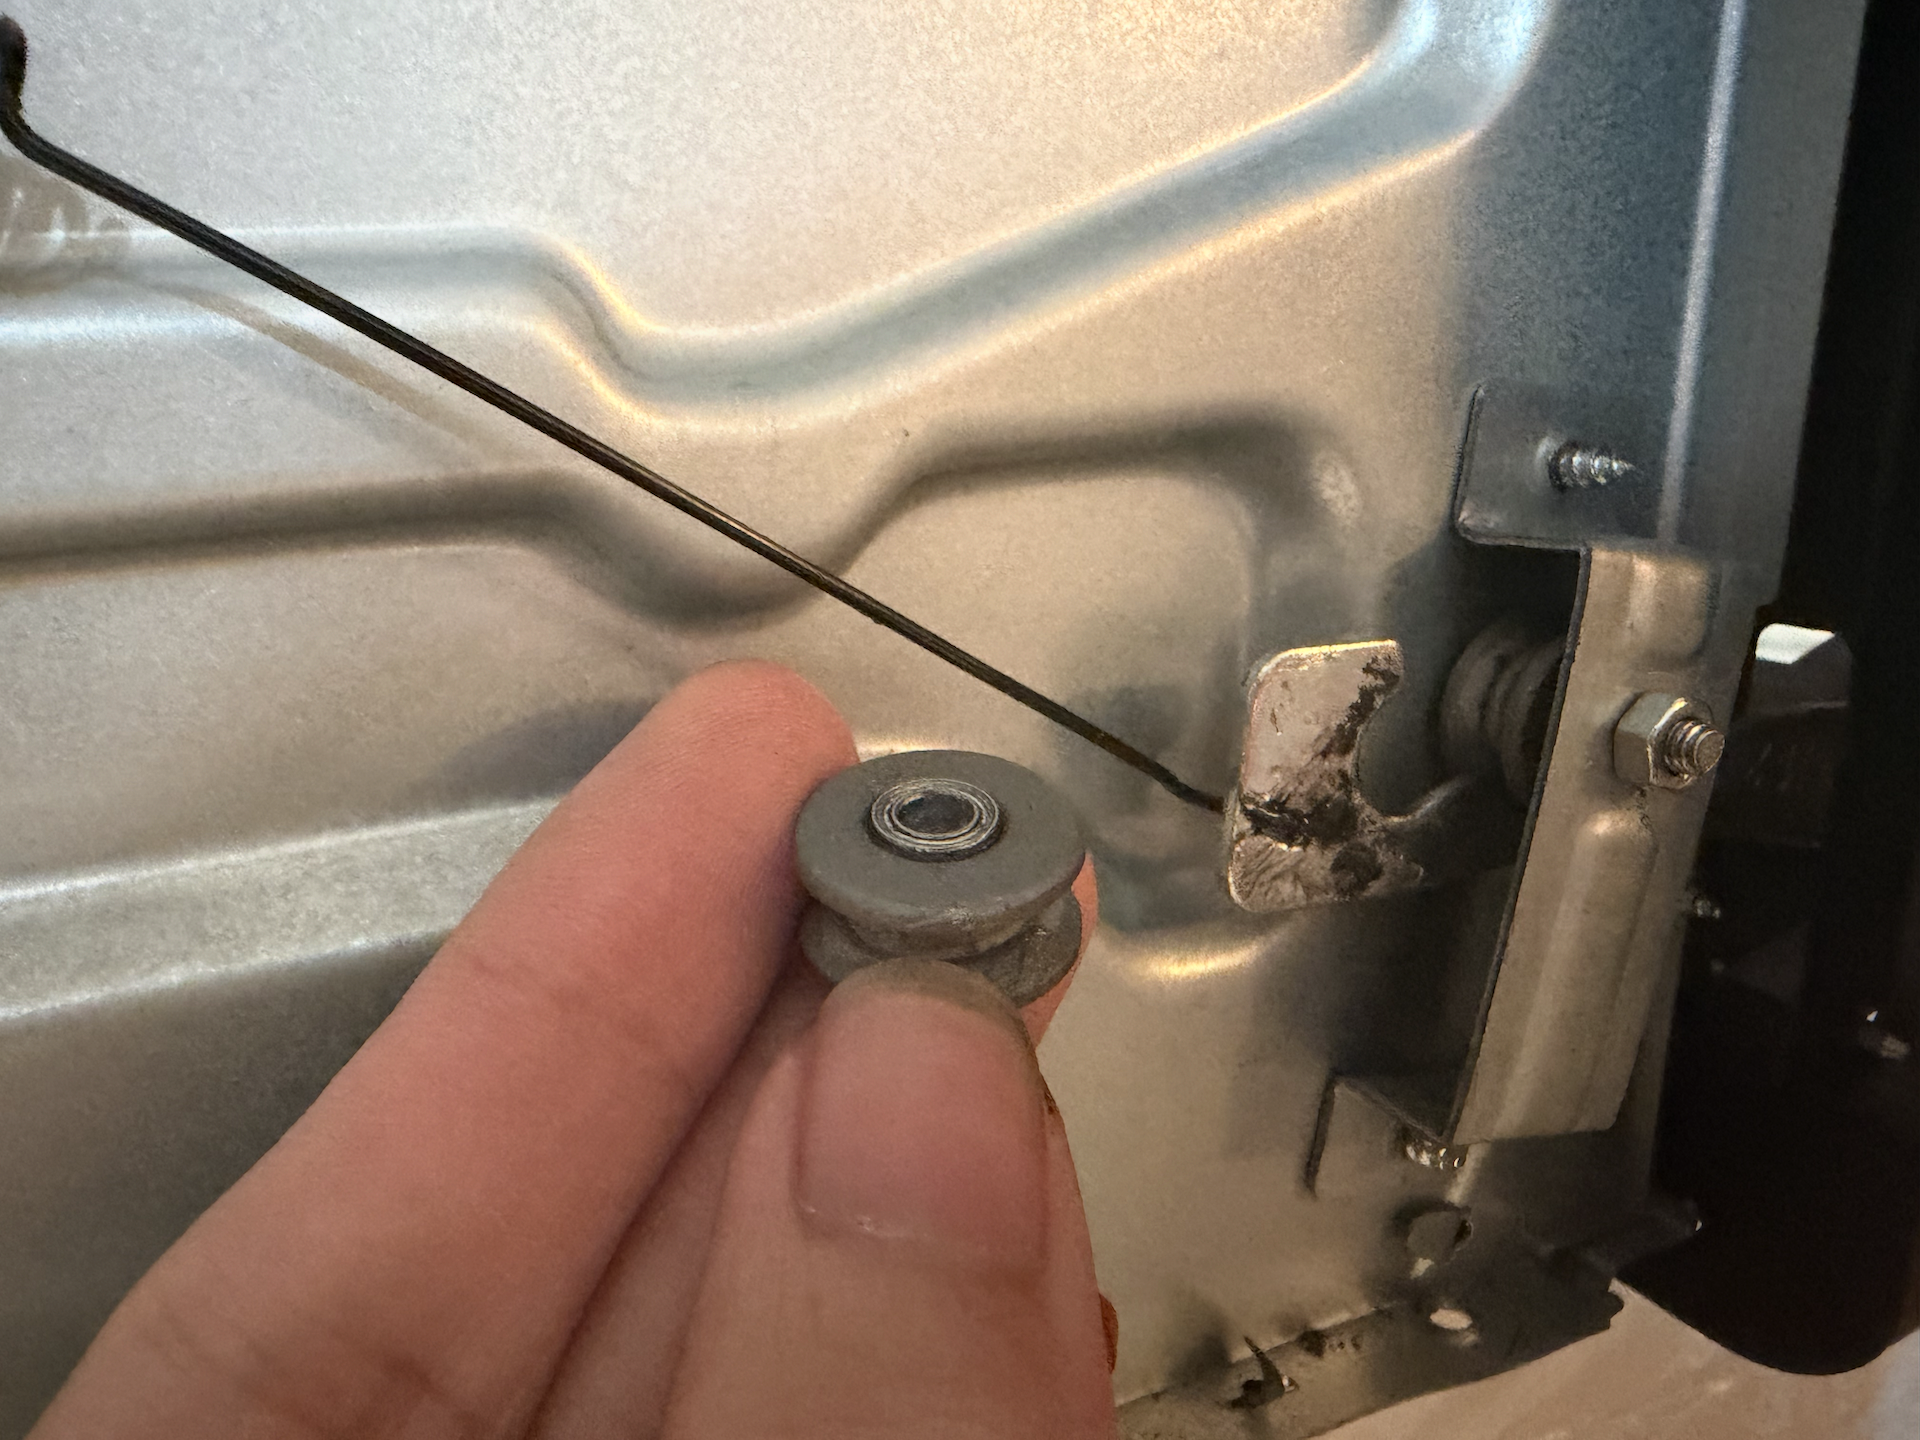 Okay, after I have received these stainless steel rollers designed by me, I decide to inject the lubricant into the bearings, with a tiny bag I still have, before they can be attached to the rollers. The lubricant is HOTOLUBE NLGI#2 all-purpose lubricant grease which states that it can endure the oven chamber temperature.
I then opened the oven again, as I was needed to reassemble it back just to let the people use it (when the permanent fix is being delivered), I included the washers as these roller and the bearings combo did not have a sort-of spacing that was included in the original bushing, and yes, I ditched it.
To have me remove the roller from the oven, I remove the nut, and then I have to push the hinge down just to let the screw & roller removal easy without having the roller pop out or something explode. This mod design is difficult to do when compared to the original. The original only has two parts and this part has seven (four of them being washers).
After that, I have to add the lubricant grease to the guide of the hinge and the outer side of the roller just to reduce wear to zero, or one.
And boom, it is fixed, permanently, this part is immune to heat, until when one of the rollers or the spring unit break again. And the door now opened way smoother than before and probably even original, which was indicated by it fully opening after trying to make it mostly open, although it can still be partly open. This is why I only installed one of them where I probably like it to live dangerously.
Rant time!!!
This oven has per-side (top and bottom separated) selectable temperature setting feature, but not the better hinge. I did not like this hinge mechanic, like distasting, it makes the manufacturer's designer look like a loser in mechanic engineering, by adding a part that wears down under heat and friction easily. This design is intended to make cheap, but that's it, there is no real contribution as the roller placed near hot materials. Especially today, this year, or eight years ago, where the more complex counterpart also costs cheap, so why shouldn't a more complex part be used?
Enjoy the repair, not shopping for new one
Repairing electronics to me is a fascinating task, well not when being told to tap into its PCB. It teaches me how it works and lets me think on how it breaks, and I have an easy skill on working around broken things, with or without CAD. Buying a new thing after the old one being broken does not entertain me, may spend too much money, and causes worse waste situation. Although, we should caution on replacement parts that are too cheap, as it might fail meeting the standards or is just a scam.
If you don't want to repair the electronics yourselves, you can always go to their repair or service center, you can book it online, through email or phone, if the company is not garbage.
Thank you for reading this log.
Updates
- 2026-04-01: The model of the oven hinge wheel is now obtainable to the followers of Oitswilliam Pang.
- 2026-03-05: Add mods category as since I replaced the original (plastic) wheels with the SLM-printed ones, which is considered modding.